
Deploying ArangoDB 3.4 on Kubernetes
It has been a few months since we first released the Kubernetes operator for ArangoDB and started to brag about it. Since then, quite a few things have happened.
For example, we have done a lot of testing, fixed bugs, and by now the operator is declared to be production ready for three popular public Kubernetes offerings, namely Google Kubernetes Engine (GKE), Amazon Elastic Kubernetes Service (EKS) and Pivotal Kubernetes Service (PKS) (see here for the current state of affairs).
We have developed a semi-automatic “acceptance test” to validate production readiness for each new platform, and therefore you can expect quick progress on this topic in the near future. However, experience shows that one has to test every single platform individually, in particular with respect to volume support, networking (load balancer services etc.) and access control.
Furthermore, the ArangoDB 3.4 release has finally happened and we have put particular emphasis on a seamless upgrade path from 3.3. In the context of k8s this means that performing a fully automatic rolling upgrade from 3.3.20 to 3.4 is as easy as editing the name of the Docker image used in the k8s specs.
In this article I would like to highlight again how convenient deployment and maintenance of a distributed ArangoDB cluster has become with the help of k8s, custom resources and our operator.
Interested in trying out ArangoDB? Fire up your cluster in just a few clicks with ArangoDB ArangoGraph: the Cloud Service for ArangoDB. Start your free 14-day trial here.
Getting started
The first to sort out is access to a Kubernetes cluster with the right credentials. With the above mentioned cloud platforms, this is essentially just a few clicks away, but one needs administrator rights for a few steps, for example for the deployment of the custom resource definitions. Therefore, we have put together detailed tutorials for the steps to set up the k8s cluster and authentication for individual cloud platforms, see this page for details, so far we have GKE, EKS and AKS (Azure Kubernetes Service), but we are going to extend this to other platforms soon.
Once your kubectl tool is installed and credentials are sorted, you can essentially just do
kubectl apply -f https://raw.githubusercontent.com/arangodb/kube-arangodb/0.3.6/manifests/arango-crd.yaml
kubectl apply -f https://raw.githubusercontent.com/arangodb/kube-arangodb/0.3.6/manifests/arango-deployment.yaml
to deploy the custom resource definitions as well as the operator itself. Note that these particular URLs contain the version which is current at the time of this writing, but the latest command is always available on this page, where you also find instructions to set up our storage operator and the one for DC2DC replication.
Furthermore, note that the custom resource definitions are global to the k8s cluster, whereas our deployment operator is deployed into a particular namespace.
You can also use helm, if you have installed the k8s package manager, instructions for this can be found here.
You can tell if the deployment operator is up and running by looking at the pods in the namespace to which you deployed it:
% kubectl get pod
NAME                                          READY   STATUS    RESTARTS   AGE
arango-deployment-operator-7564c5d8cb-8bgs8   1/1     Running   0          1m
arango-deployment-operator-7564c5d8cb-lgsqc   1/1     Running   0          1m
There are two copies for fault-tolerance, they agree on who is the current leader via the API of k8s.
Example deployment
Deployment of an ArangoDB cluster is now fairly straightforward, the minimal example uses this YAML file:
apiVersion: "database.arangodb.com/v1alpha"
kind: "ArangoDeployment"
metadata:
  name: "my-arangodb-cluster"
spec:
  mode: Cluster
  image: "arangodb/arangodb:3.3.20"
You essentially just have to specify the custom resource type, the fact that you would like to have a cluster and the Docker image name.
With this in the file cluster.yaml you just do:
% kubectl apply -f cluster.yaml
arangodeployment.database.arangodb.com/my-arangodb-cluster created
I have intentionally used 3.3.20 since I will demonstrate the seamless upgrade to 3.4 in just a few minutes.
After usually less than a minute you see the cluster that has been deployed:
% kubectl get pod
NAME                                          READY   STATUS    RESTARTS   AGE
arango-deployment-operator-7564c5d8cb-8bgs8   1/1     Running   0          7m
arango-deployment-operator-7564c5d8cb-lgsqc   1/1     Running   0          7m
my-arangodb-cluster-agnt-n7aus7hc-d02e07      1/1     Running   0          51s
my-arangodb-cluster-agnt-svdqknuq-d02e07      1/1     Running   0          50s
my-arangodb-cluster-agnt-zq0i9hsv-d02e07      1/1     Running   0          48s
my-arangodb-cluster-crdn-n67yuq6f-d02e07      1/1     Running   0          44s
my-arangodb-cluster-crdn-qnbkdc0y-d02e07      1/1     Running   0          42s
my-arangodb-cluster-crdn-varovat2-d02e07      1/1     Running   0          41s
my-arangodb-cluster-prmr-5hjg9ggs-d02e07      1/1     Running   0          47s
my-arangodb-cluster-prmr-ikboimi8-d02e07      1/1     Running   0          46s
my-arangodb-cluster-prmr-pxuxgocl-d02e07      1/1     Running   0          45s
What you see here is a cluster with the following components:
- three “agents” (with agnt in the pod name), which are the central, RAFT-based key/value store which holds our cluster configuration and handles supervision and automatic fail-over,
- three “dbservers” (with prmr in the pod name), which are the instances which actually hold your data,
- three “coordinator” (with crdn in the pod name), which take the client request, handle query planning and distribution.
Additionally, the operator has set up a load balancer to sit in front of the coordinators for us. Since this is done on GKE, the load balancer is by default for external access using a public IP address:
% kubectl get service
NAME                         TYPE           CLUSTER-IP      EXTERNAL-IP      PORT(S)          AGE
arango-deployment-operator   ClusterIP      10.11.248.82    <none>           8528/TCP         53m
kubernetes                   ClusterIP      10.11.240.1     <none>           443/TCP          1h
my-arangodb-cluster          ClusterIP      10.11.247.191   <none>           8529/TCP         46m
my-arangodb-cluster-ea       LoadBalancer   10.11.241.253   35.239.220.180   8529:31194/TCP   46m
my-arangodb-cluster-int      ClusterIP      None            <none>           8529/TCP         46m
The line starting with my-arangodb-cluster-ea is the external access service, the type LoadBalancer is the default if this is possible on the k8s platform being used. Since by default, everything is deployed using TLS and authentication, one can now point a browser to https://35.239.220.180:8529 for ArangoDB’s web UI:

Insecure Connection Warning Browser
This is, because the operator uses self-signed certificates by default, therefore we have to accept an exception now in the browser, once this is done (potentially up to 3 times because there are 3 coordinators behind the load balancer), you get the actual login screen:

Login screen
Choose the user name root with an empty password, select the _system database and change the password immediately!
Indeed, if we click to “NODES” in the left navigation bar, we see that we have a cluster with three coordinators and three dbservers:

Cluster overview
We have added quite some explanations in this section, but at the end of the day, all that was needed was a 7 line YAML file and a single kubectl command.
Scaling
After the initial deployment, scaling your ArangoDB cluster is the next task we want to demonstrate. By far the easiest way to do this is by simply clicking a button in the above overview screen, and indeed, when I add a dbserver, it takes a few seconds and a new one shows up:
 Scaled up cluster
The same is visible in the list of pods:
% kubectl get pod
NAME                                          READY   STATUS    RESTARTS   AGE
arango-deployment-operator-7564c5d8cb-8bgs8   1/1     Running   0          1h
arango-deployment-operator-7564c5d8cb-lgsqc   1/1     Running   0          1h
my-arangodb-cluster-agnt-n7aus7hc-d02e07      1/1     Running   0          1h
my-arangodb-cluster-agnt-svdqknuq-d02e07      1/1     Running   0          1h
my-arangodb-cluster-agnt-zq0i9hsv-d02e07      1/1     Running   0          1h
my-arangodb-cluster-crdn-n67yuq6f-d02e07      1/1     Running   0          1h
my-arangodb-cluster-crdn-qnbkdc0y-d02e07      1/1     Running   0          1h
my-arangodb-cluster-crdn-varovat2-d02e07      1/1     Running   0          1h
my-arangodb-cluster-prmr-5f4ughlx-0e03d5      1/1     Running   0          28s
my-arangodb-cluster-prmr-5hjg9ggs-d02e07      1/1     Running   0          1h
my-arangodb-cluster-prmr-ikboimi8-d02e07      1/1     Running   0          1h
my-arangodb-cluster-prmr-pxuxgocl-d02e07      1/1     Running   0          1h
Note the one with AGE 28s, this has been deployed by the operator after it has spotted that I had clicked + in the ArangoDB UI for the dbservers. I could have achieved the same by simply editing the deployment specs with kubectl, a simple
kubectl edit arango my-arangodb-clusterbrings up my favorite editor and all the specs in all their glory:
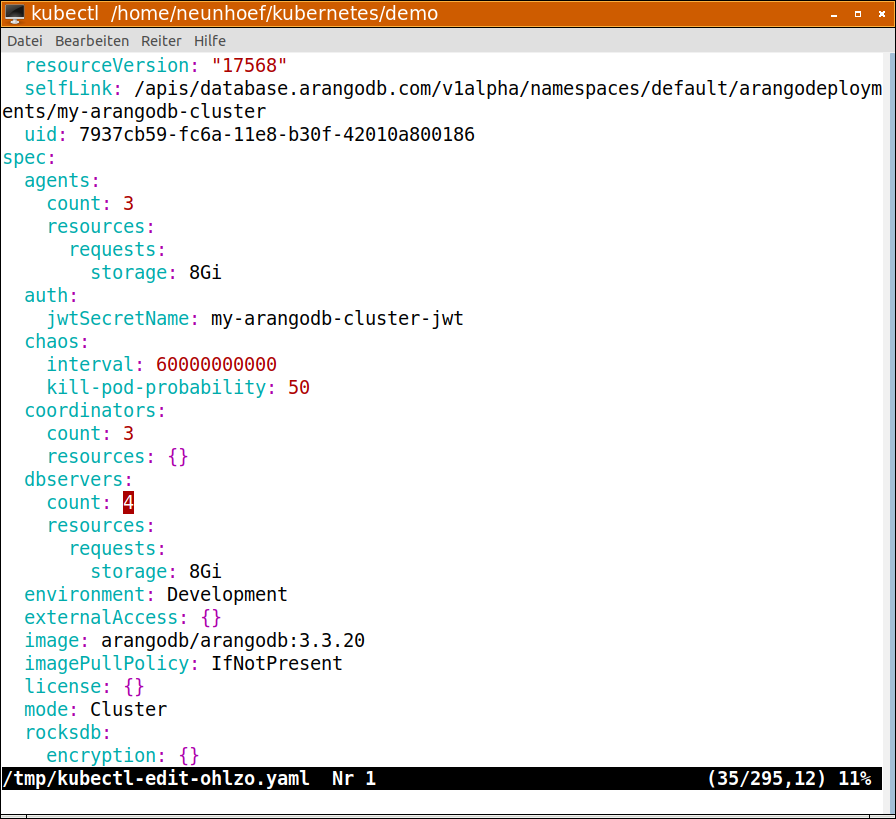 Editing the specs
In this screen shot you see me editing the number of dbservers from 4 back to 3. Yes! Indeed it is possible to scale down the number of dbservers as well. The operator will first clean out dbservers gracefully and make it so that the data is moved over to the remaining ones. In the end, it will shut down the pod and remove the dbserver from the cluster automatically.
The same works for the coordinators. You can scale the coordinator layer as well as the dbserver layer independently. If you need more (or less) storage, get more (or less) dbservers. If you need more (or less) CPU power to optimize and coordinate queries, get more (or less) coordinators.
External access
Obviously, the situation with the self-signed TLS certificates is not entirely satisfactory. If you want to have your own CA whose certificate is once and for all stored in your browsers and accepted, then you can tell this to the operator, such that it will sign all certificates used by your ArangoDB cluster with your own CA key. This establishes a valid chain of trust, so you get rid of the security warnings.
The right place to store such secret keys are Kubernetes secrets. All you have to do is to create a secret with this command:
kubectl create secret generic my-test-ca \
    --from-file=ca.crt=/path/to/ca.crt \
    --from-file=ca.key=/path/to/ca.key
where /path/to/ca.crt is the CA certificate and /path/to/ca.key is the private key. Then you have a k8s-secret called my-test-ca.
Furthermore, we must use the following cluster.yaml file:
apiVersion: "database.arangodb.com/v1alpha"
kind: "ArangoDeployment"
metadata:
  name: "my-arangodb-cluster"
spec:
  mode: Cluster
  image: "arangodb/arangodb:3.3.20"
  tls:
    caSecretName: my-test-ca
    altNames: [ "arangodb.9hoeffer.de" ]
This tells the operator two things, first of all, it uses the secret with the name my-test-ca to sign all TLS certificates for all ArangoDB instances, and secondly, these certificates will say that they are for a server with the DNS name arangodb.9hoeffer.de, you would obviously put a name in your own domain here.
Note that we have a hen-egg-problem here. The external IP address will only be known during the deployment, but the signed certificates are already needed at that time. We solve this with the DNS name, at the cost that we need to be able to change the IP address to which this particular DNS name resolves, once we know it. So I put the IP address of the load balancer in the DNS server and then I can actually point my browser to https://arangodb.9hoeffer.de:8529 and get the UI without any security alert, since I have already registered the CA certificate with my browser:
 Secure TLS deployment
Please note that for this example I had to get rid of my cluster and deploy it anew, since we do not yet support exchanging the CA certificate in a running deployment.
Rolling upgrades
Finally, I would like to take the advent of ArangoDB 3.4 as an opportunity to mention rolling upgrades. All I have to do to upgrade my already running cluster to the new version is to edit the line with the Docker image name. Thus, I simply change cluster.yaml into this:
apiVersion: "database.arangodb.com/v1alpha"
kind: "ArangoDeployment"
metadata:
  name: "my-arangodb-cluster"
spec:
  mode: Cluster
  #image: "arangodb/arangodb:3.3.20"
  image: "arangodb/arangodb:3.4.0"
  tls:
    caSecretName: team-clifton-test-ca
    altNames: [ "arangodb.9hoeffer.de" ]
Note that I have left the old name as a comment to highlight the difference. I deploy this to k8s by doing:
kubectl apply -f cluster.yamlThe operator will now do the following: It will launch a test balloon which is a container running the new image. From this the operator can read off the SHA256 of the Docker image as well as the version of ArangoDB. It then notices that this is 3.4.0 instead of 3.3.20 and automatically knows that this is an upgrade procedure from one minor release version to the following. Therefore, it will automatically perform a rolling upgrade, starting with the agents, proceeding with the dbservers and then the coordinators. It will do one by one, run the appropriate upgrade procedure for each, and then redeploy a new pod with the new Docker image.
As long as you are using synchronous replication and a replication factor of at least 2 this works without service interruption. Here is an intermediate display of kubectl get pod during the procedure:
% kubectl get pod
NAME                                          READY   STATUS            RESTARTS   AGE
arango-deployment-operator-7564c5d8cb-8bgs8   1/1     Running           0          2h
arango-deployment-operator-7564c5d8cb-lgsqc   1/1     Running           0          2h
my-arangodb-cluster-agnt-kxm1nxqg-789e15      1/1     Running           0          37s
my-arangodb-cluster-agnt-uvi3imhq-789e15      0/1     PodInitializing   0          10s
my-arangodb-cluster-agnt-wpek6bdp-d7b7cb      1/1     Running           0          43m
my-arangodb-cluster-crdn-oxieqvz2-d7b7cb      1/1     Running           0          43m
my-arangodb-cluster-crdn-s7bovzfr-d7b7cb      1/1     Running           0          43m
my-arangodb-cluster-crdn-vrvlubyv-d7b7cb      1/1     Running           0          43m
my-arangodb-cluster-prmr-dsibgeeg-d7b7cb      1/1     Running           0          43m
my-arangodb-cluster-prmr-rjqumkxb-d7b7cb      1/1     Running           0          43m
my-arangodb-cluster-prmr-y9eslmij-d7b7cb      1/1     Running           0          43m
You can see that one of the agents has been restarted 37 seconds ago, whereas the rest is up for 43 minutes. One of the agents has just been redeployed and the corresponding pod is just being initialized. And indeed, the UI now shows a cluster with Version 3.4:
 Upgraded cluster running Version 3.4
Outlook and closing words
Kubernetes and our operator are here to stay. We expect that a lot of customers will give k8s a try and will eventually use it as the primary way to deploy ArangoDB. Therefore, we are going to put considerable effort into the development of the operator. We will add features like easy backup and restore, and improve convenience for monitoring and other topics that are relevant for production. Furthermore, we will test the operator on more platforms and eventually declare it production ready on them once we are really convinced.
If you need to know more details, then we have you covered with more documentation: Our manual has a chapter which serves as a tutorial, which can be found here. Furthermore, reference information about deployment on k8s is found in this chapter. The Kubernetes operator is fully open source and the code is out there on GitHub which has its own copy of the documentation in this directory. The contents of this article are available as on our YouTube channel.
Finally, if you are new to ArangoDB, give the new Version 3.4 a spin or read about its features in our release article. If you like what you see, tell others and star us on GitHub. If you run into problems, let us know via GitHub issues or ask questions on StackOverflow.
1 Comment
Leave a Comment
Get the latest tutorials, blog posts and news:
Hey!
Could you write a similar guide to deploying Arangodb on Azure Container Instances