
ArangoDB in 10 Minutes with Node.js: Quickstart Guide
Estimated reading time: 10 minutes
This is a short tutorial to get started with ArangoDB using Node.js. In less than 10 minutes you can learn how to use ArangoDB with Node. This tutorial uses a free ArangoDB Sandbox running on ArangoGraph that requires no sign up.
Let’s Get Started!
We will use the Repl live coding environment for the rest of the tutorial. This also requires no sign up and should already be ready to go.
The Repl editor at the bottom of the screen has a link at the top to return you to where you left off in the instructions and the instructions include links to the editor, to help make navigating back and forth simple. If you would prefer to work in the editor in a separate tab or window click the “open in Repl” button in the top-right corner of the editor.
Note: The first time you attempt to type in the editor it will refresh, this is normal as it is ‘forking’ the project so that you can edit your own.
Section 1
Throughout the course clicking Repl editor will bring you to the repl editor and save your spot in the instructions. Once you are ready, click the “Click to return to instructions” link to go back to where you left off.
The installation step is not required because the necessary packages are already loaded in our sandbox environment. The steps are only provided for you to use in your other projects.
Typically the first step in getting started with ArangoDB and NodeJS is to install the ArangoDB JavaScript Driver. You can install locally or globally:
- To install locally:
npm install arangojs
- To install globally:
npm install --global arangojs
We import this in our application using the require syntax on line 1:
const arangojs = require("arangojs");
Before we can start performing any CRUD operations we need a handle to an existing ArangoDB
database. We will use the sandbox database and credentials supplied to you
which are already stored in the sandboxCredentials.yaml file.
This is done by creating a new instance of Database, using the sandbox hostname.
Now, let’s take a look at how to actually connect to an ArangoDB Database using the ArangoJS Driver.
- Scroll to the bottom of the Repl editor to find the comment for Section 1 and connecting to an ArangoDB Database in the startServer function (line 173).
- (lines 175-177) Here we use the async/await syntax to create a new database
object. The db object
      db = await new arangojs.Database({
      url: hostname
      });
is initially just a connection to the supplied hostname without authorization for any resources. - (lines 179-180) Once we have established a connection we can indicate that we
want to use our sandbox database and then authenticate using our sandbox credentials.
These credentials are stored in the sandboxCredentials.yaml file.
await db.useDatabase(dbName); await db.useBasicAuth(username, password); - (line 181) The last step we perform is making sure the collection that
all of our endpoints rely on, exists. The approach that we take here is to
assign our collection handle to the collection variable
collection = await db.collection(collectionName);and then we use the exists method to see if the collection exists. If it doesn’t we can use the create method to create the collection. - (line 184 or 189) Finally, once we are confident that all of the necessary
dependencies are availabe, we can start the Express server.
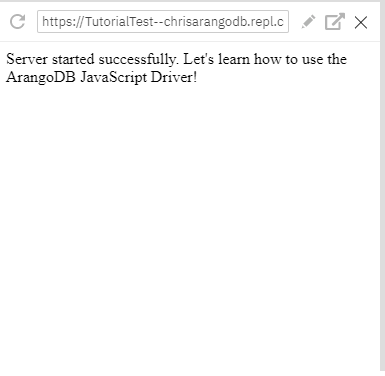
app.listen(3000, () => { console.log('server started'); }); - If you haven’t already, click the start/run button at the top of the Repl editor. Hopefully, you are greeted with a page indicating the server has started successfully.
Move on to section 2 to setup the first endpoint.
Section 2
In this section we will look at how to use the db and collection objects we created in section 1 to create a new document. Once we create our document we can also view it in the ArangoDB WebUI.
- First, let’s go ahead and uncomment the first POST endpoint in, the Repl editor. To uncomment, highlight the code and then press ctrl/cmd + / . You should see comments indicating the beginnig and end of it. (line 37-54) You will also need to restart the server by clicking the same run/restart button at the top of the editor.
- To keep things simple we are not actually doing anything with the request body.
Instead we create a doc variable with some example data.
      const doc = {
        a: 'foo',
        b: 'bar',
        c: Date()
      };
This is only to keep things simple for the tutorial but you could handle the request body just like you normally would to create an ArangoDB document. We will work with a request body in the next section. - Once you have data you would like to save, you pass the object to the
save method.
await collection.save(doc)We are also performing some error handling. This makes sure the document is actually inserted and gracefully handles any failures, such as a duplicate _key value. If the document is inserted we send back the _key of the newly created document.await collection.save(doc) .then( doc => { res.status(201).send("Inserted doc with key value of: " + doc._key); }, err => {res.status(400).send("Document not inserted - " + e.message)} )We will use the _key that was created in our next route. - Thanks to repl providing us with a public IP address, you can test this
endpoint with your favorite tool. You will use the URL shown in the browser window of
the Repl editor
that shows the “Server successfully started!” message.
An easy option is to open a terminal and use curl:
Windows Powershell – replace with your URL:curl -Uri https://YourAutoGeneratedURL.repl.co/doc -Method Post
Linux/Mac – replace with your URL:curl -d --url https://YourAutoGeneratedURL.repl.co/doc
You should receive a response similar to:Inserted doc with key value of: 100145469
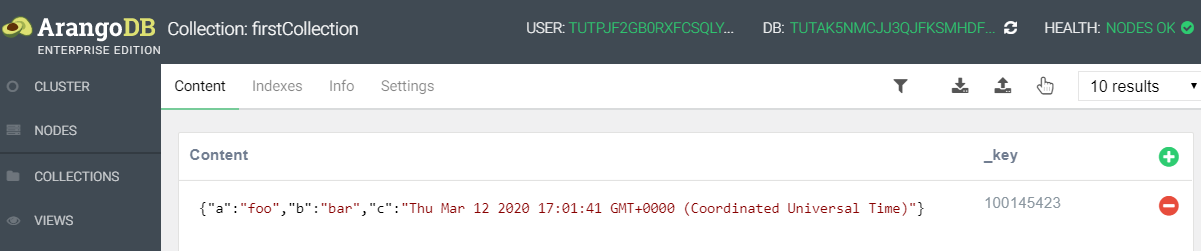
- Now that you have inserted a document, let’s take a momemnt to pull up the ArangoDB WebUI. You can access the WebUI by clicking HERE, which is the same URL that we used for the hostname in Section 1. You will need to supply your sandbox username and password, which you can find in the sandboxCredentials.yaml file or in the browser window of the Repl editor.
- Once you are signed in you can go to the collections tab on the left,
where you should see a collection named firstCollection. Clicking on this
you should see at least one document with the example data we supplied in
the endpoint.
With our endpoint uncommented, let’s have a look at what is happening.
That’s it for this section, next up we will look at updating our newly created document.
Section 3
In this section we will look at how to update our newly created document using either a document _key or _id.
- First, go ahead and uncomment the PUT endpoint (lines 64-90), in the Repl editor. To uncomment, highlight the code and then press ctrl/cmd + / . You should see comments surrounding it that indicate its start and stop point. (lines 64-90)
- While it might look like a bit more is happening here the
update method
should be easy to learn. You need to provide a
document handle which for us means either an _key or _id of an existing
document. This is why the first portion of the endpoint checks that a
handle was supplied:
let handle = ''; if (typeof doc._key !== 'undefined') { handle = doc._key; } else if(typeof doc._id !== 'undefined') { handle = doc._id } else { return res.status(400).send({ success: 'failure', message: "Document _key or _id required to perform update." }); } - After supplying a handle, you need to supply an object with the desired
document updates. We assume that the body of this request contains a valid object.
If it doesn’t the update request will fail and the error will be handled.
The third option in our update request is the options (opts) object. For this request
we indicated that we wanted the updated document to be returned by supplying
the ‘returnNew’ option and setting it to true. The options object is optional and to see all available options
please see the
update documentation
await collection.update(handle, doc, {'returnNew': true}) .then( doc => { res.status(201).send(doc); }, err => {res.status(400).send("Document not updated - " + err.message)} ) - To test that this endpoint is working we will send a request that uses
the newly created document _id value and a new attribute to add to the document.
This can also be accomplished with curl or your perferred tool.
You need to replace both the URL and _key value with your own, from the Repl editor. Windows Powershell:curl -Method PUT -Uri https://YourRepl--URL.repl.co/doc -Body '{"_key": "102146594", "d": "newValue"}' -ContentType "application/json"Linux/Mac:curl -X PUT -H "Content-Type: application/json" -d '{"_key": "102146594", "d": "newValue"}' https://YourRepl--URL.repl.co/docYou should receive a response similar to:{ "_id":"firstCollection/102146594", "_key":"102146594", "_rev":"_aL-jks---A", "_oldRev":"_aL-hLeS--_", "new":{ "_key":"102146594", "_id":"firstCollection/102146594", "_rev":"_aL-jks---A", "a":"foo", "b":"bar", "c":"Thu Mar 12 2020 18:44:28 GMT+0000 (Coordinated Universal Time)", "d":"newValue" } }If you now take a look at the document in the WebUI the new attribute should show there as well.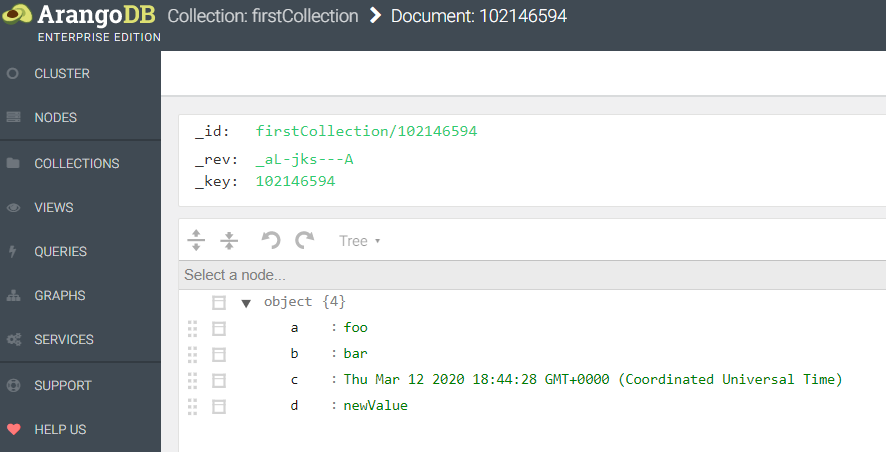
This finishes up the section for how to update a document. Next up, we take a look at ArangoDB’s favorite way to interact with data, AQL.
Section 4
For many, AQL is the easiest and most intiutive way to interact with data in ArangoDB. This holds true when using language drivers in ArangoDB as well. It is simple to use AQL queries, thanks to the built in AQL helpers. The ArangoJS driver has built-in helpers for AQL queries, string literals, and for joining AQL queries.
The AQL endpoint shows a way to get started with AQL by returning the first 10 documents that exist in our collection. For more information about the AQL helpers in ArangoJS see the documentation.
- In order to use the aql helper in our endpoint we assign it to a variable
back at the top of the application on line 8, in the Repl editor.
const aql = arangojs.aql; - Go ahead and uncomment that code, in the Repl editor! (lines 99-111)
- (lines 101-105) For our simple get request we start with using the
query method
of our db object, along with the
aql helper.
This aql helper allows us to put the aql query in template tags. This
provides additionally flexibility in how the query can be structured.
Useing template tags also allows for using outside variables, such as
the ${collection} variable that we use in the FOR loop.
const cursor = await db.query(aql` FOR d IN ${collection} LIMIT 10 RETURN d `); - (line 106)
You may have noticed that we initially assign the query to a variable named
cursor. This is a common practice when dealing with large results, the cursor
fetches data in batches from the database. You can iterate through the cursor
using cursor.next() or you can assign all results to a single variable with
cursor.all(), which is what we do here.
const result = await cursor.all();We have a lot more information on cursor and how to use it in the cursor documentation . -
Now that we have our results we can send them back to the user.
res.status(201).send(result); - To test this route we can use, once again, use curl.
Remember to replace the URL with your own, from the Repl editor.
Windows Powershell:curl -Method GET -Uri https://YourRepl--URL.repl.co/aql
Linux/Mac:curl https://YourRepl--URL.repl.co/aql
You should end up with results that contain 10 of the documents you have added to the collection up to this point.
We have now covered the basics of getting started with the ArangoJS driver. For the last section we will see how to clean up and remove the documents in the database
Section 5
The process for removing a document from a collection is very similar to the update method. It only requires that you supply a document handle and, optionally, any options(opts).
To see the available options for the remove method check out the documentation for remove
- First things first, uncomment the delete endpoint, in the Repl editor. (lines 119-144)
- (lines 121-131) We perform the same checks for a document handle
as we did for update.
let handle = ''; if (typeof doc._key !== 'undefined') { handle = doc._key; } else if(typeof doc._id !== 'undefined') { handle = doc._id } else { return res.status(400).send({ success: 'failure', message: "Document _key or _id required to perform remove operation." }); } -
(lines 134-137) To delete or remove a document we use the
remove method
and pass in the document handle.
await collection.remove(handle) .then( doc => { res.status(201).send(doc); }, err => {res.status(400).send("Document not removed - " + e.message)} ) - For our final test we will use… curl!
You need to replace both the URL and _key value with your own, from the browser
window of the Repl editor.
Windows Powershell:curl -Method DELETE -Uri https://YourRepl--URL.repl.co/doc -Body '{"_key": "100151401"}' -ContentType "application/json"Linux/Mac:curl -X DELETE -H "Content-Type: application/json" -d '{"_key": "100151401"}' https://YourRepl--URL.repl.co/docYou should receive a response containing the system attributes of the document you deleted. Depending on your platform it will look similar to:
{
            "_id":"firstCollection/100151401",
            "_key":"100151401",
            "_rev":"_aLD02C2---"
          }
That’s all there is to removing a document from a collection.
Now that you have completed this getting started with ArangoJS tutorial, I implore you to continue tinkering with this project while your sandbox instance is available. If you would like to continue using ArangoDB in the cloud, this sandbox is running on ArangoGraph our cloud managed service and you can sign up for free 14 day trial at cloud.arangodb.com!
Hear More from the Author
Projects with ArangoDB ArangoGraph
Organizations with ArangoDB ArangoGraph
Continue Reading
How We Wronged Neo4j & PostgreSQL: Update of ArangoDB Benchmark 2018
Index types and how indexes are used in ArangoDB: Part I
NoSQL Performance Benchmark 2018 – MongoDB, PostgreSQL, OrientDB, Neo4j and ArangoDB
1 Comment
Leave a Comment
Get the latest tutorials, blog posts and news:
Great write-up.
I really appreciate the way you have written and explained. Worth reading it.
Thanks for sharing it with us.
Good work..!!